Customisation Guide
How to edit the BlueMap website, for example to make it fit more with your server’s brand.
Keep in mind that some BlueMap updates require you to delete the index.html file to update the webapp, so make sure to remember any edits you do to it and any of BlueMap’s other source files, because you will need to apply them again.
Info:
Throughout this guide,/bluemap/web/shall be assumed as the default webroot. If you’re using a custom, different webroot, please make sure to use that instead.
- Theme and look
- Embed
- Website favicon
- Website title
- Default language
- Info menu
- Screenshot file name
- Domain
- Extra side-bar button
- Map icons
Theme and look
BlueMap allows you to write custom CSS snippets, with which you can style the BlueMap interface exactly to your liking.
Info:
If you don’t know how to write CSS yet, here is a good guide: developer.mozilla.org/en-US/docs/Learn/CSS
To get started with BlueMap CSS, you should create a .css file in your webroot (usually /bluemap/web/).
Then you need to register that stylesheet with BlueMap, so it’ll actually load it.
You do this in webapp.conf, by putting the file name in the styles: [ ] list.
After adding it to the list, you’ll probably want to reload BlueMap, so BlueMap applies the changes you’ve made to the configs. You can do so with the /bluemap reload light command.
To test if it works, you can use this simple style:
/bluemap/web/my-custom-style.css:
:root {
    --theme-bg: red;
}
plugins/BlueMap/webapp.conf:
styles: [
    "my-custom-style.css"
]
This should make all BlueMap’s buttons fully red.
From here on, you can customise any BlueMap class you want.
Embed
In some places, when you share a link to your map, it’ll embed a bit of extra info. In Discord it looks like this:
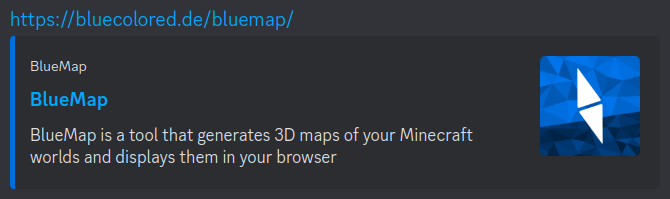
You can change how this looks by editing the bluemap/web/index.html file.
The options you can safely change are the description, theme-color, og:site_name, og:title, og:description, and og:image.
The
og:imageattribute should be a full URL link, not a relative path.
Website favicon
A favicon is the icon you’ll see on the tab in your browser, and in the favourites bar if you’ve favourited the website.
There are two ways to change BlueMap’s favicon:
- Replace the favicon image
/bluemap/web/assets/favicon-8768b872.png - Copy a new image file to the BlueMap webroot (or
assetsdirectory) and edit the<link rel="icon" href="./assets/favicon-8768b872.png">inindex.htmlto refer to your new image instead.
Website title
The title is the text that is on the tab in your browser.
Changing the <title> tag in the index.html will not work!
You need to change it in each language file, which are at /bluemap/web/lang/.
The option pageTitle in the .conf files in this directory are what you need to change.
Default language
You can change the default language for your map, which will apply for all new visitors. It will not change the language for people who have already visited your site once already.
In /bluemap/web/lang/settings.conf is the setting default, which you can change to any of the locales listed below it.
Info menu
BlueMap has an Info menu in the sidebar, which is also completely customisable.
You can edit it in the each language file, which are at /bluemap/web/lang/.
The option info: { content: is the one you need to edit for this.
It accepts any normal HTML.
Screenshot file name
BlueMap has a screenshot feature, which downloads a screenshot to your device.
You can change the filename of that by opening the /bluemap/web/assets/index-123456.js file, and then doing a Ctrl+F for “bluemap-screenshot.png”.
By changing that piece of text, you can choose any other filename you wish.
Domain
To use a custom domain for your BlueMap, instead of a numerical IP, it works like any other website.
In your domain’s DNS settings, you should point an A Record to the IP of the server your BlueMap is hosted on.
Keep in mind that this will not remove the need to type the port afterwards!
To fix that, you need an external webserver. Here is a guide on how to do that with NGINX: NginxProxy
It is not possible to do remove the port with an SRV Record, like you probably did for your Minecraft Server. Browsers do not support SRV Records.
Extra side-bar button
There is currently no simple way to do this, sadly. The best way would be to clone the BlueMap webapp source code, modify that, and recompile it.
That is very complicated, though, and also a lot of effort.
Luckily a community member has devised a workaround to do this anyway! (Even if it’s not ideal…)
For this, we will make use of the BlueMap feature that allows us to inject any custom JavaScript snippets that we want.
To get started, you should create a .js file in your webroot (usually /bluemap/web/).
Then you need to register that script with BlueMap, so it’ll actually load it.
You do this in webapp.conf, by putting the file name in the scripts: [ ] list.
After adding it to the list, you’ll probably want to reload BlueMap, so BlueMap applies the changes you’ve made to the configs. You can do so with the /bluemap reload light command.
Ththe following codeblock is the content of the script file. You can customise the text of the button by changing what’s inside the label div, and you can change what it links to by replacing the link in the a’s href attribute.
/bluemap/web/my-custom-button.js:
const buttonTemplate = document.createElement("template");
buttonTemplate.innerHTML = `
<a style="text-decoration: none" href="https://bluemap.bluecolored.de/">
    <div class="simple-button">
        <div class="label">Visit BlueMap Website</div>
    </div>
</a>
`.trim();
const button = buttonTemplate.content.firstChild;

setInterval(() => {
    const buttonList = document.querySelector(".side-menu .content")?.children.item(0);
    if (buttonList && Array.from(buttonList.children).every(el => el.tagName === "HR" || el.className === "simple-button")) {
        buttonList.appendChild(button);
    }
}, 10);
plugins/BlueMap/webapp.conf:
scripts: [
    "my-custom-button.js"
]
The example above will open your new button within the same window.
To force it to open within a new/separate tab within your browser, immediately after href="https://bluemap.bluecolored.de/", include the following: target="_blank".
Example:
buttonTemplate.innerHTML = `
<a style="text-decoration: none" href="https://bluemap.bluecolored.de/" target="_blank">
    <div class="simple-button">
        <div class="label">Visit BlueMap Website</div>
    </div>
</a>
`.trim();
Map icons
Similar to adding a custom button to the side-bar, it’s possible to include your own custom world icons. This would replace the existing tiny "•" to the left of the world name, represented by the sky colors.
To get started, you need to upload the world icon images that you’d like to use, into your assets webroot (usually /bluemap/web/assets/). Ideally, have the images be no larger than 32x32 pixels, and to use the code below, you should rename them to match the respective .conf file name found within /BlueMap/maps/, and the file type used in this example is a .png.
Examples:
/bluemap/web/assets/world.png/bluemap/web/assets/world_nether.png/bluemap/web/assets/world_the_end.png
Next, you should create a .js file in your webroot (usually /bluemap/web/).
Then you need to register that script with BlueMap, so it’ll actually load it.
You do this in webapp.conf, by putting the file name in the scripts: [ ] list.
After adding it to the list, you’ll probably want to reload BlueMap, so BlueMap applies the changes you’ve made to the configs. You can do so with the /bluemap reload light command.
/bluemap/web/map-icons.js:
// trigger an update to map icons
document.body.addEventListener("click", function() {
  setTimeout(updateMapBtns, 50);  // needs slight delay to work properly
});

// updating the map buttons
function updateMapBtns() {
  // find map-buttons (if available)
  const mapBtns = document.querySelectorAll(".map-button");
  mapBtns?.forEach(btn => {
    // grab the "title" for the btn
    let btnTitle = btn.getAttribute("title");

    // grab the "display-name" to update the image alt-text
    let btnName = btn.querySelector("span.name").innerText;

    // replace sky "•" with block image
    let btnSkySpan = btn.querySelector("span.sky");
    let btnImg = `assets/${btnTitle}.png`;
    let newImg = new Image();
    newImg.src = btnImg;
    newImg.alt = btnName;
    btnSkySpan.innerText = "";  // remove the "•"
    btnSkySpan.appendChild(newImg);
  });
}
If you’re using another image type that isn’t .png, make sure to update this line to the appropriate file type (and location) you’re using:
let btnImg = `assets/${btnTitle}.png`;
Finally, you’ll want to consider adding some custom CSS to have the images fit within the menu appropriately.
Repeat the process for creating a custom JavaScript file above, but for CSS.
Create a .css file in your webroot where the .js file is stored.
Then you need to register the styles.
In webapp.conf, put the CSS file name in the styles: [ ] list.
After adding it to the list, you’ll probably want to reload BlueMap, so BlueMap applies the changes you’ve made to the configs. You can do so with the /bluemap reload light command.
/bluemap/web/map-icons.css:
/* map [world] icons */
.side-menu .map-button {
    overflow: hidden;
}

.side-menu .map-button .sky {
    font-size: 2em;
    margin: 0 1em 0 0.5em;
}

.side-menu .map-button .sky img {
    max-width: 32px;
    max-height: 32px;
}